This proposed paper desk mat is deliberately small: its woven field is 120 by 100 mm, enough to frame a light stationery arrangement rather than cover an entire desk. Twelve vertical strips cross ten horizontal strips in a two-color checker weave. The complete plan below supplies every strip length and the order of every crossing. It is an authored design, not a photographed or physically tested sample, and it makes no claim to be a heat-resistant, washable or food-safe placemat.
1. Separate the field from the cutting lengths
Choose two distinguishable paper colors and call them V and H. The letters remain in the chart so that understanding the pattern does not depend on the screen colors alone. Use paper and ordinary measuring and cutting equipment suitable for your own use, following their supplied directions. This is not a child-activity or tool-training instruction.
Cut twelve V strips, each 10 mm wide and 120 mm long. Their central 100 mm crosses the ten rows; the remaining 10 mm at each end is an edge-finishing tab. Cut ten H strips, each 10 mm wide and 140 mm long. Their central 120 mm crosses the twelve columns; again leave 10 mm at each end.
The paper budget is therefore twelve 10-by-120 rectangles and ten 10-by-140 rectangles. Their total cut area is 28,400 square millimeters: 14,400 for V and 14,000 for H. That is a sum of strip areas, not the area of one completed layer. At each crossing, two strips overlap, so the final field is not found by placing all that area side by side.
2. Mark a coordinate system you can keep
Place the twelve vertical strips in column order 1 through 12, left to right, with long edges touching but not overlapping. Their top tabs should align. Mark the field's top boundary 10 mm from those top ends and its bottom boundary 110 mm from them. The 100 mm between those lines is where the ten rows belong.
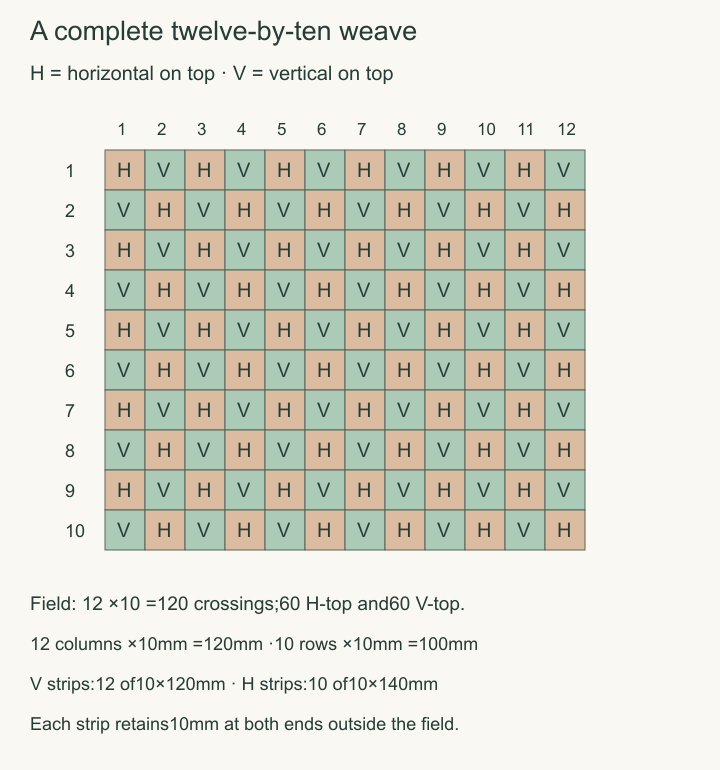
In the chart, row 1 is the top row and row 10 the bottom. A cell marked H means the horizontal strip is above the vertical one at that crossing. A cell marked V means the vertical strip is above. These letters name the visible upper strip, not instructions to remove or cut the lower one.
Prepare the first H strip with its central field marked from 10 to 130 mm along its length. When inserted, its left mark meets column 1's left edge and its right mark meets column 12's right edge. This leaves equal 10 mm tabs beyond the woven field, rather than letting the first crossing consume the finishing margin.
3. Alternate both within the row and between rows
For row 1, pass H over column 1, under column 2, over column 3 and continue alternating through column 12. Its complete upper-strip sequence is H V H V H V H V H V H V. Position that row immediately below the top field boundary, without putting it inside the top tabs.
For row 2, reverse every crossing: begin under column 1, over column 2 and continue. The visible sequence is V H V H V H V H V H V H. A change of paper color without this reversal would not produce the intended alternating interlacement.
Rows 3,5,7 and 9 repeat row 1. Rows 4,6,8 and 10 repeat row 2. The rule can be checked at any cell: H is on top when the row number plus column number is even; V is on top when that sum is odd. Thus row 10,column 12 shows H, because 22 is even.
4. Check the complete field before closing the edges
Work the rows toward their intended positions with the strips relaxed, keeping the two outer field boundaries aligned. The plan assumes strips can be arranged without unwanted gaps; it does not promise that every paper thickness or stiffness behaves alike. Do not force a thick or brittle material into the numerical drawing.
Count twelve columns and ten rows. Each row contains six H-top and six V-top crossings. Across ten rows there are 60 of each,120 crossings in all. A pair of neighboring rows should reverse every column. These checks locate an order error before the tabs make the affected crossing harder to reach.
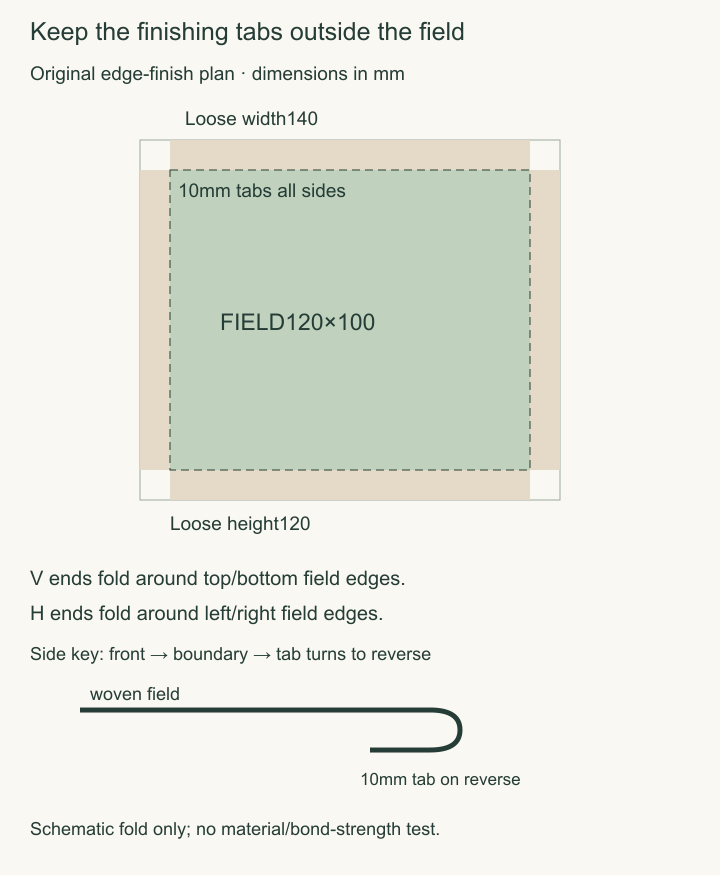
With no gaps or overlaps between neighboring strips, twelve widths of 10 give 120 mm and ten widths give 100 mm. Before finishing, the end tabs extend the loose overall envelope to 140 by 120 mm. Keep that larger envelope distinct from the intended finished field; trimming it back prematurely would remove the finishing allowance.
5. Fold the margins to the reverse
The edge-finish drawing is a proposed folded-back finish. Turn each 10 mm end tab around the field boundary onto the reverse side, keeping the fold at the boundary rather than inside the checker field. The tabs at the top and bottom belong to the vertical strips; those at the left and right belong to the horizontal strips.
If securing the tabs, select an adhesive intended for the actual papers and follow its application and drying directions. The plan supplies no invented drying time, bond strength or coating recipe. Do not spread adhesive across the visible field to make it resemble a laminated surface. This is a decorative dry-paper piece.
Top and side tabs meet near the corners but do not require an added corner square in this design. Inspect the reverse before securing a crossing: a raised or bunched corner means the actual material needs adjustment, not pressure to make the diagram come true. The nominal finished outline remains 120 by 100 mm after the tabs turn inward.
6. Give the finished plan an appropriate role
The design can supply a small decorative area for light, dry stationery. It has not been load-tested and should not be used as protection from hot drinks, moisture, food or sharp equipment. Its purpose is the visible interlacement and the complete making plan, not a performance claim about an untested paper surface.
If changing the size, decide whether to change strip width or add rows and columns. Keep the finishing allowance separate in either case. A useful first variation would preserve the twelve-by-ten chart and change the two colors; adding a third color would create another ordering decision rather than repair the weave logic.